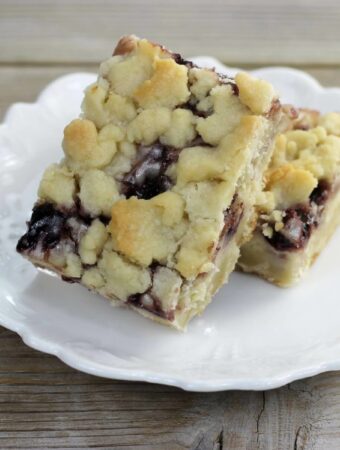
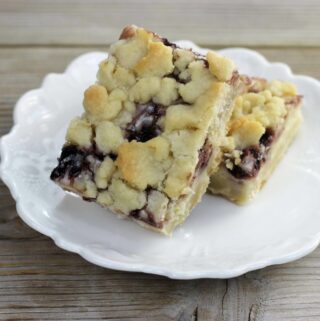
Wednesday, May 22, 2013

Saucy BBQ Shredded Pork


I wanted to make some sandwiches this past weekend using a pork tenderloin that we had in the freezer. Usually I would have made a simple pulled pork with dried onion soup and salt and pepper, but we were hungry for something that was a little more tangy. And by the way the pulled pork made with the dried onion soup mix makes for a delicious sandwich; it one of my favorite ways to make it.

I have been making my own barbecue sauce for years, but I decided to experiment and try a few different ingredients with the ones that I normally use. And of late I have found that I like adding a little yellow mustard to my tomato based sauces such as barbecue sauces, for a little extra tang.

As I was writing about the yellow mustard I was thinking of when Mike and I first got married many years ago; whenever we had the pork and beans (the canned ones) he would always add a little yellow mustard to them for more flavor. So I am surprised that I didn't think of this sooner.

I made this in my crock pot, but it would be perfect made in the oven. If you make it in the oven I would cook it slowly on a 300 to 325 degree F.


Saucy BBQ Shredded Pork
Ingredients:
3 to 4 pound pork tenderloin 
1 medium onion, thinly sliced
2 cloves garlic, minced
1 cup ketchup
1 cup water
3 tablespoons Worcestershire sauce
2 tablespoons vinegar
1 tablespoon yellow mustard
1/4 cup brown sugar
1 teaspoon paprika
1/2 teaspoon cumin
1 pinch cinnamon
Salt and pepper to taste
Directions:
Place the pork tenderloin in the crock pot, place the onions and garlic over the meat. Salt and pepper the meat to taste. Mix the rest of the ingredients together until well blended. Pour the ketchup mixture over the meat, onions, and garlic. Cook on low for 4 to 5 hours remove the meat from the crock pot and shred, return and continue cooking for another 1 to 2 hours or until tender. Serve on your favorite buns.


Monday, May 20, 2013

Honey Glazed Roasted Carrots


We were in the grocery store this past weekend, I found myself in the fruit and vegetable department, I knew it was time to make another vegetable recipe and post it on my blog. As I was looking around contemplating which vegetable to choose, I saw bags of carrots on the shelf and decided to pick them.

We never eat carrots cooked by themselves. If we eat them cooked they are usually in a soup or roasted along with a roast of some sort. So I decided that this would be a great time to try this vegetable by itself; kind of like a new adventure.

I know that carrots have a sweet taste on their own, but I really wanted to find a recipe that would add even a little more sweetness to them with a little bit of honey. To me honey glazed carrots sounded the way to go with my family and roasting them was another plus.

I didn't read the recipe all the way through, I more or less look to see what the ingredients were along with the temperature and the time. Now as I am posting this I looked at the recipe a little closer and see that I was supposed to save the glaze and pour it over the vegetables after they were cooked. I did just the opposite I poured it over before placing the baking dish in the oven and let the honey bake into the carrots.

Sometimes mistakes turn out for the best; I loved these carrots. The honey baked into the carrots leaving them just a bit sweeter that usually. And as always the roasting at a high temperature makes all vegetables taste so good. The next time I make this recipe I think I will stick with putting the glaze on the carrots before roasting them I really don't think they could get any more delicious.


Honey Glazed Roasted Carrots (Source: fearlesskitchen.com)
Ingredients:
2 pounds carrots peeled and left whole
3 tablespoons olive oil - plus a little more to drizzle while roasting if needed
1/2 teaspoon dried sage
2 tablespoons honey
1 tablespoon lemon juice
Salt and pepper to taste
Directions:
Preheat oven to 400 degrees F. Line a roasting pan with aluminum foil
Peel carrots leaving them whole. Place them in the roasting pan.
Take olive oil, sage, honey, and lemon juice and mix it together in a small bowl. Pour over carrots and toss until the carrots are well coated, season with salt and pepper.
Place the roasting pan in the preheated oven. Make sure to stir carrots every 15 minutes. If the carrots appear a little dry drizzle a little more olive over them.
Bake for 40 to 45 minutes, until fork tender. Serve.


Friday, May 17, 2013

Watermelon Strawberry Smoothie


I feel like I was not prepared for my blog this week. Usually I like to have the recipes that I am going to post for the week ready over the weekend, but this weekend not all my recipes turned out how I planned.

I am going to side step and start from the beginning. We were in Minneapolis a few weeks ago; we went to a market place called Global Market. They had vendors selling all kinds of foods. We walked past a bakery and I fell in love with their baked goods. Everything was just beautiful; to me it was almost like looking at a piece of art work being the foodie that I am.

They sold lemon curd tarts that were really gorgeous and each tart was topped with a beautiful meringue caps. I came home excited because I knew that they would be perfect for my blog and could not wait to make them. I decided on strawberry curd for something a little different. Well to make a long story short, the tarts did not turn out like I had hoped they would and I decided that they were not blog worthy.

So now I was short one recipe and since I am trying to keep on a schedule I had to scramble to find something to replace my tarts. We had strawberries in the fridge that were getting to the point that they needed to be eaten and extra watermelon. So I thought it would be great to use this fruit in a nice smoothie.

At least the smoothie wasn't a disappointment. The strawberry and watermelon turned out to be a great combination, nice and refreshing.


Watermelon Strawberry Smoothie
Ingredients:
5 to 7 cups watermelon cut into small pieces
9 large strawberries (about 2 cups) frozen
3 tablespoons honey
1 tablespoon plus 1 teaspoon lime juice
4 ice cubes
Directions:
Add all ingredients into a blender and blend until well blended. Serve immediately.


Wednesday, May 15, 2013

Banana Oatmeal Muffins


I am back to baking breakfast foods for my daughter Krista. As I had mentioned in one of my past post she has moved again. She was home for a few months after her internship in Chicago, but now has taken a job in Minneapolis. So when she came home last weekend I wanted to make something for her to take back to her new home.

It was a busy weekend so I wanted something simple, but yet something that she would enjoy and something that was a little bit healthy. I found a recipe for banana oatmeal that sounded easy to make and thought she would enjoy them.

One thing when baking with bananas you are usually guaranteed that it will be nice and moist. I also love baking with cinnamon, it always gives food great flavor and I love the aroma of it. Even though I baked them for my daughter I did have to sample one to see how they would taste. I have to say they were a nice tasty muffin, something I will make again.


Banana Oatmeal Muffins (Source: adapted from mrbreakfast.com)
Ingredients:
2 medium bananas, mashed
1 cup all-purpose flour
1 cup of oatmeal
1 cup of buttermilk
1/4 cup brown sugar
1/2 cup sugar
1/4 cup butter, softened
1 large egg
2 1/2 teaspoons baking powder
1/2 teaspoon salt
1/2 teaspoon cinnamon
Directions:
Prepare muffin cups with muffin papers or a lightly greased.
Preheat oven to 375 degree F.
In a large mixing bowl, combine the flour, oats, baking powder, salt, and cinnamon.
In a separate smaller bowl, cream butter and sugars together by hand until the texture is like wet sand.
In a third bowl, beat the egg. Add milk and mix well.
Combine all three mixtures in the largest bowl. Mix well. Stir in the mashed bananas.
Spoon batter into prepared muffin cups, filling each about 2/3 full.
Bake for about 25 minutes or until golden brown (start checking after 20 minutes). If a toothpick inserted into the center of a muffin comes out clean the muffins are done.


Monday, May 13, 2013

Breakfast Potato Skins


We are big potato eaters at our house. I love the combination of eggs, potatoes and bacon. So a great way to serve this combination is right in the potato skins. Yes, it may take a little bit more time to prepare, but the combination served this way is worth the effort.

We made these over the weekend, for a late brunch. Mike loved them; he loves potato skins, so this was right up his alley. As for me I am not as big a fan of potato skins, but I have to admit that I really loved these for brunch. I know that we will be making these again. Next time we will try some different flavors, maybe some ham or breakfast sausage.

And as for the potatoes that were scooped out, they didn't go to waste. I fried them up for some hash
browns as a side dish. So it truly was a win win all the way around.


Breakfast Potatoes Skins
Ingredients:
3 Russet potatoes, baked
1/4 cup onion, finely chopped
1/4 cup red pepper, finely chopped
Non stick spray
6 eggs
4 tablespoons milk
1/2 cup cheddar cheese
Bacon, crumbled
Salt and pepper to taste
Directions:
Preheat oven to 425 degree F.
Take potatoes that have been baked or micro waved and scoop out the potato leaving a little of the potato behind. Spray the potato with oil and season with salt and pepper, place on a baking sheet. Place in a preheated oven and bake for about 10 minutes, until the edges of the potatoes start turning a golden brown.
While the potatoes are in the oven spray a small skillet with non stick spray; add the onion and pepper and cook over medium heat until tender, about 3 to 5 minutes. Fry bacon until crisp once completed crumble. Beat eggs with milk season with salt and pepper; add to a skillet that has been sprayed with a non stick spray. Cook eggs over medium heat stirring often.
Once the eggs, bacon, onions, and peppers are done. Take the potatoes that have been crisped up, taking half the onions, peppers, bacon sprinkle over the bottom of each potato. Fill each potato with the prepared eggs. Top the eggs with the remaining onion, peppers, and bacon. Finally top the filled potatoes with the cheddar cheese. Place the potatoes back in the oven for about 5 minutes until the cheese is melted. Serve and enjoy.


Friday, May 10, 2013

Ultimate Chocolate and Peanut Butter Cake


I pinned this recipe at least a few months ago. It really blew me over when I saw the cake, it was amazing and the recipe sounded amazing too. It is chock full of peanut butter cup and chocolate and the frosting is a creamy peanut butter frosting.

When I found this recipe I knew that I was going to save it for a special occasion, such as my daughter's birthday. Lisa loves chocolate and peanut butter so I knew that it would be the ultimate birthday cake. It turned out that not only did she love it; the rest of the family loved it also, except for Mike who is the only one that doesn't like peanut butter.

Seriously, if you like peanut butter and chocolate you have to make this cake. It will blow your socks off it is that yummy!


Ultimate Chocolate and Peanut Butter Cake (Source: Adapted from delightlyfulldowling.com)
Cake ingredients:
1 box of chocolate cake mix
1 small package of Jello instant chocolate pudding mix
1 cup sour cream
1 cup vegetable oil
4 eggs beaten
1/2 cup milk
1 teaspoon vanilla extract
2 cups mini Reese's Peanut Butter cups, chopped
Cake directions:
1. Preheat oven to 350 degrees F.
2. In a very large bow, mix together everything except the Reese's Peanut Buttercup. Batter will be very thick, stir in the Reese's Peanut Butter cups. Pour batter into cake pans that have been greased and floured. Bake for about 10 minutes more than the cake box suggests or when checking with a tooth pick it comes out clean.
3. Note: I used 2 8-inch cake pans; I think they would do better in 2 9-inch cake pans or divide the batter into 3- 8 inch cake pans.
4. Remove from cake pans and set on cooling racks and cool completely.
Frosting Ingredients:
1 cup butter, at room temperature
1 cup smooth peanut butter
4 cups powdered sugar
1/4 teaspoon salt
1 teaspoon vanilla
1/2 cup whipping cream
Frosting directions:
1. In a mixing bowl, cream butter and peanut butter until fluffy. Add sugar and continue creaming until well blended. Add salt, vanilla, and whipping cream, blend on low speed until moistened. Then beat at high speed until frosting is fluffy.
2. Frost cooled cake. I frosted the top of the first cake and top of the frosting a sprinkled chopped Reese's Mini Peanut Butter cups. Place the other cake on top and continue to frost the rest of the cake. Chop more Reese's Mini Peanut Butter cups and garnished the cake. I bought a 2.5 pound bag and used almost the whole bag. I did take some chocolate candies to garnish part of the cake. Do your own thing and garnish the way you would like to.


Wednesday, May 8, 2013

Texas Roadhouse Rolls and Honey Butter - Copycat Recipe


We started another year of celebrating our kids' birthdays. We celebrated our daughter Lisa's birthday this past weekend. BBQ ribs were requested for her birthday dinner. She loves going to a restaurant called the Texas Roadhouse, she has told me that they have the best food. Some of you that live in the states may have heard of this restaurant, it looks like they are located in most states.

One of the things on the menu that she loves is their rolls and honey butter. She didn't request these for her meal, but I thought I would surprise her and make them along with the ribs. I was anxious to make the rolls since she had mentioned that they were so good, plus the fact that I love making bread.

These rolls are super simple to make, which is always a good thing. You don't have to form each roll; you simply roll the dough out into a rectangle and cut them into squares. They were super fluffy and light, definitely on the list to make again. And as for the honey butter, it was perfect on the rolls. It was definitely a keeper also.


Texas Roadhouse Rolls - Copycat Recipe (Source: eatcakefordinner.com)
Ingredients:
4 teaspoons active dry yeast
1/2 cup warm water
2 cups milk, scalded and cooled to lukewarm
3 tablespoons of melted butter, slightly cooled
1/2 cup sugar
7 to 8 cups all-purpose flour
2 whole eggs
2 teaspoons salt
Directions:
Dissolve yeast in warm water with a teaspoon of sugar, let stand until frothy. Combine yeast mixture, milk, 1/2 cup sugar and enough flour to make a medium batter (about the consistency of pancake batter).  Beat thoroughly. Add melted butter, eggs, and salt. Beat well. Add enough flour to form a soft dough, kneading the dough for until smooth and satiny. Grease the bottom of the bowl and turn dough over to coat both sides. Cover and let rise in a warm place until double in bulk. Punch down. Turn out onto a greased surface. Roll out dough int a rectangle, about 1/2 inch thick, then fold the rectangle in half, making it about 1 inch thick. Seal the ends to keep the dough together. Using a pizza cutter and cut the rolls into squares, place the rolls on to greased baking sheet. I had about 19 big rolls, but you can cut them into the size the you prefer. Let the rolls rise  until double and bake in a 350 degree F preheated oven. Bake rolls until lightly golden brown about 15 to 17 minutes. Remove from oven and baste rolls with butter.  Serve with honey butter, recipe follows.

Honey Butter
Ingredients:
1/2 cup butter room temperature
1/4 cup powder sugar
1/4 honey 1 teaspoon cinnamon
Directions:
Whisk butter for approximately 30 seconds until lightly whipped. Add the sugar, honey, and cinnamon beat with electric mixer until smooth and thoroughly combined, scraping down the sides of the bowl while mixing. Continue beating on medium-high speed until light and fluffy, about 2 to 3 minutes.